Tuesday, March 1, 2011

Veggie Challenge #13: Baby Artichokes

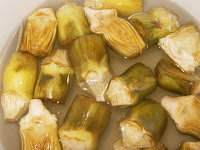
Ahem! I said artichokes, not hollandaise sauce. I'm with you though, when I think artichoke, I think steamed with yummy lemon butter dipping sauce. Well, I will be the first to tell you that I may be a changed woman after having baby artichokes roasted.
The beauty of baby artichokes is that the "choke" - or the hairy middle part that you cannot eat - is not yet developed. You can literally trim these and eat almost the whole thing. Now, I read conflicting reports - one saying that baby artichokes are a different breed than their bigger cousins and another saying that they are just less mature versions of their bigger brother. I did some looking and I cannot find a definite answer either way for you, but would love to know if someone out there knows.  (Let me know!)

Trimming these puppies is the important part. You want to slice off the top inch or so with a serrated knife to get rid of the sharp, dark green leaves. Peel back the remaining leaves to expose the light green inside leaves. Remove the bottom quarter-inch of the stem and then peel it using a paring knife. Slice the artichokes lengthwise and immediately toss into a lemon water bath to prevent browning - which happens fast!

Toss trimmed artichokes into a pot of boiling water and blanch for 1-2 minutes. These baby chokes are tender enough that this step is optional, but they are certainly ready faster this way as they require less roasting.

I tossed the artichokes with a little bit of good olive oil, fresh garlic, salt and pepper and roasted in a 400F oven for 20 minutes. (Can't WAIT to grill these babies come summer!) They will take well to flavor, so don't be afraid to get a little crazy!

Monday, February 28, 2011

More Carbs: Ginger Coconut Cranberry Granola Bread

Carbs are the wind beneath my wings.
One last bread entry. For now...

On a recent weekend, Gladiola (Boy's sister) and I got together to make bread. Off to Debra's Natural Market we went to pick up some odds and ends to include in the recipe. (Ahh, heaven on earth!) The beauty of this recipe - that I have used many times before - is that you can substitute just about anything into it. It calls for granola with fruit in it, raisins, and another dried fruit of your choice.

This is what we used. Are you ready for this??

Granola: "Not So Sweet" Maple Granola
Raisins: Organic Dried Cranberries
Dried Fruit of Choice: Organic Dried Ginger, lightly sugared with Organic Cane Sugar
Wild Card (Because we are risk-takers like that!): Unsweetened Organic Coconut Flakes

I had never tried sweetened dried ginger. Gladiola urged me to try it. It took only a small nibble and I was ready to spit it out all over the kitchen island. Ginger is an amazing flavor and I love cooking with it fresh, but dried is a whole new ballgame. Imagine the strong flavor essentially condensed down to one right-hook-to-the-face bite. The result is not so good for nibbling on alone, but a great accent flavor for an otherwise tame-flavored loaf of bread. I was highly skeptical when Gladiola suggested it, but I will admit that I am very pleased I let her talk me into it.

We also decided to bake it without using a loaf pan. The result was a beautiful, super-fancy looking round loaf. It almost looks like we knew what we were doing!

Friday, February 25, 2011

Random: Homemade Vanilla Extract

I respect the five food groups, but I have some opinions of my own on some amendments. Three to be exact. Chocolate. Lime. And Vanilla. If these were each food groups I would be the healthiest person walking the planet, because I try to get a serving or two of each of those in a day in addition to the normal groups. (That's right, margaritas would be a food group in my world...)
I use vanilla every chance I get. And that is an expensive habit, people. I buy pure organic vanilla extract and it runs $15 for 4 ounces or $3.75 per ounce. This is where my addiction gets real - I am going to monetize it. (Have you ever done this with your daily coffee? It's horrifying.) I will be bold here, but I bet I average one 4-ounce bottle a month over the course of the year. That equates to $180/year in vanilla. Whew. That is right up there with my pedicure habit.

I have come across - several times now - articles about people making their own vanilla. After doing some research into the price of vanilla beans, I realized I would be saving a boatload of money and it would be homemade. An obvious win-win.

Boy's sister (we will call her "Gladiola") has introduced me to Debra's Natural Gourmet which is a local market in her neighborhood. I am hopelessly obsessed with this place. In my never-ending quest to find things locally and organically I am always at a loss for words standing in their bulk aisle. Debra's carries everything from rare, whole spices to crazy varieties of organic flour. I thought I had died and gone to heaven. Back to my point though. We wandered in last weekend and I found that they had great looking vanilla beans at a price that was very competitive with ordering them online. I excitedly picked up a gaggle (that obviously means 12) of vanilla beans and was on my way.
Making vanilla extract involves soaking scraped vanilla beans in booze. And crappy booze at that. Amazing, I know. You can use just about any alcohol, but the two most common I saw mentioned were vodka and bourbon. Vodka is what is traditionally used, but bourbon creates a more complex flavor. (Yes, please.) I decided to make one jar of each.

Vanilla Extract
5-8 vanilla beans
3-4c. low-quality liquor (I used Jim Beam bourbon and Stolichnaya vodka. Tequila was also mentioned, but that will have to wait.)

Slice the vanilla beans down the center and scrape goo from the middle into jar. Follow this process with all vanilla beans and put the beans in as well. Fill jar with alcohol, but leave enough room at the top that you can vigorously shake to mix. Let rest in a place that is away from light for 2-3 months. Shake daily for the first week and then once weekly for the remainder. 
The moral of the story is that I have 56 ounces of vanilla that will be waiting for me in about two months. And it will have only cost me around $30. That is $0.54 per ounce down from $3.75. Obvious win.

I will post results in a couple months!

Thursday, February 24, 2011

A Continued Winter Carb Bender: Braided Pesto Parmesan

Carbs are the wind beneath my wings.
And here we go again with the bread. This time, a savory loaf for dipping in delicious blended winter soups. I came across this recipe, and with a jar of pesto standing idly by in the fridge, was immediately sucked in. This is a very simple recipe that makes nice basic white bread. I followed this recipe and loved it, but also, being who I am, experimented a bit as well. The bread itself is a nice foundation to incorporate things other than pesto and parmesan. I tried the sweet route and sprinkled with a cinnamon/sugar mixture and used raisins instead of pesto and parmesan. (And obviously forgot to take pictures. Ugh.) Delicious.

Pesto Bread
2c. warm water
2T. olive oil
2T. sugar
1/2c. skim milk powder
1T. salt
1T. yeast
5-5.5c. bread flour
2/3c. pesto
1c. parmesan

Combine water, olive oil, sugar, milk powder, salt, and yeast in a large bowl. (Bowl of the mixer if you are copping out and using that method instead of hand kneading.) Add flour 1 cup at a time until dough pulls away from sides of bowl or forms a nice ball. Knead for 8-10 minutes. Place in an oiled bowl and turn to coat. Cover and let rise for 60 minutes - or until doubled - in a warm place. (Remember my hint that I used with the Challah... it works wonders!) 

Divide the dough in half. With one half, roll the dough out to a large rectangle - approximately 8x12". Spread pesto and parmesan on dough leaving a half-inch border. Starting on the long side, roll the dough up into a log and pinch to seal. Place the sealed side down and gently cut down the center into two pieces. Join the pieces on one end and weave them together, pesto side up. Repeat with other section of dough. 

Place loaves in pans and cover to let rise for 30-45 minutes or until they double in size again. Bake in a 375F oven for 35 minutes. 

Wednesday, February 23, 2011

Veggie Challenge #12: Belgian Endive (Chicory)

I have only ever seen endive used as a vehicle to eat delicious dips and cheeses at cocktail parties. That being said, I have only ever licked delicious dips and cheeses from endive while at said cocktail parties. I ooze class, I know.

After seeing some of the chefs on Chopped breeze through round after round where endive was an ingredient I decided it was time to try the stuff for real. From what I have read, there are two most common ways to prepare endive - roasted or braised. I chose to take the braised route. 

Upon first glance, endive basically looks like mini heads of romaine lettuce. To prepare them, rinse lightly and remove the stem end. Slice them in half lengthwise and cut the core out using an upside down V cut.  

Garlic and Lemon Braised Endive
3-4 heads of endive, rinsed and prepared
1c. water
2 cloves of garlic
juice of 2 lemons
sea salt & pepper
olive oil

Pour a small amount of olive oil and crush garlic in the bottom of a dutch oven over med-high heat. Place endive - cut side down - and allow to brown for 2-3 minutes. Squeeze lemon over top and pour water down the side of the pan so as not to disrupt the placement. Sprinkle with sea salt and pepper. Cover and let steam for 5-7 minutes or until fork tender. 
Endive certainly has an interesting flavor. The lemon and garlic in this recipe are just enough to take the edge off the bitterness that is characteristic of endive. After tasting it braised, I can see the allure of serving appetizers on a fresh endive leaf. The bitter notes would be a perfect compliment to lots of different things... and it looks super fancy. How can you go wrong?


Tuesday, February 22, 2011

File This One Under Weird: Shad Roe

A Friendly WARNING: This is not for the faint of heart. Re-hashing this recipe to write this post has me somewhat nauseous as I am thinking about what it was that we actually ate. Welcome to New England, baby, our delicacies are downright weird!

Let's begin with a quick explanation of Shad Roe. Shad is a bony fish native to the Atlantic Ocean that is especially prized for its roe - or eggs. Shad roe is considered a sign of Spring here in New England (personally, I prefer daffodils...) and is usually available beginning in late February or early March for only a short time. Boy and I were cruising our local fish market and upon asking our routine question - What's good today? - were excitedly rushed over to the roe. (As you can see in the photo, the roe looks more like a liver - split into lobes - but contains thousands of eggs.) Being the texture-phobe that I am, it took a good 15 minutes of convincing before my adventurous side kicked in. To my credit though, looking at the roe sac sitting on ice was less than appetizing. Frankly, it was nauseating.

The preparation suggestion we received from our awesome Fish Guy was to wrap each lobe of the roe tightly in good bacon and pan sear until just firm... just DON'T puncture the membrane that encases the roe. Hmm, ok. Easy enough. Who doesn't love an excuse to buy delicious Vermont bacon?

I have to applaud boy for his amazing bacon wrapping skills. (One more glass of wine and I would have had him convinced to put it on his resume...)
We pan-seared the bacon wrapped roe until the bacon was just cooked and I must say the result was fantastic. Once cooked, shad roe has the consistency of couscous that has been allowed to stick together with a slightly liver-esque flavor. All in all, I am very glad that we were able to try this delicacy. (More excited at the prospect of being in the know were I ever to come across it on a menu.)
Bacon-wrapped Shad Roe with Broccolini and mushroom risotto.

Friday, February 18, 2011

A Snowy Winter Continues...

For a girl with pretty serious texture issues when it comes to food, I do love me some good tapioca. Growing up, homemade tapioca was commonplace in our house.

Tapioca is chock full of dairy when made traditionally, but there is hope for a non-dairy version. So, for all you non-texture-averse lactards out there, as Bud Light would say - this one's for you.
 I have been testing out unsweetened almond milk recently in everything from my morning coffee to... well, this tapioca. Almond milk is naturally very sweet and makes a great substitution for regular milk. For example, when I put it in my coffee, I don't add any sugar and in this recipe, I was able to cut back on the sugar as well. 

As you can see, this is the small pearl minute kind. (Boo.) I always prefer the large pearl that requires soaking, but my local Shaw's Supermarket just wasn't working with me on this one. 

For the record, this is the recipe from the side of the tapioca box substituting Almond milk, but I will re-write it for you here:

Fluffy Tapioca Cream
1 egg, separated
6T. sugar, divided - cut back at your discretion
3T. Tapioca
2c unsweetened Almond milk
1t. vanilla

Beat egg white in small bowl with electric mixer on high speed until foamy. Gradually add 3 Tbsp. sugar, beating until soft peaks form. Mix tapioca, remaining sugar, almond milk and egg yolk in medium saucepan. Let stand 5 minutes. Cook on medium heat, stirring constantly, until mixture comes to full boil. Remove from heat. Quickly stir egg white mixture into hot tapioca in saucepan until well blended. Stir in vanilla. Cool 20 minutes; stir. Serve warm or chilled. For creamier pudding, place plastic wrap on surface of pudding while cooling. Stir before serving. Store leftover pudding in refrigerator.

Try your hand at it.  Delicious!